

Serum — Mac download
Download (30 MB) Earlier builds
Ticked
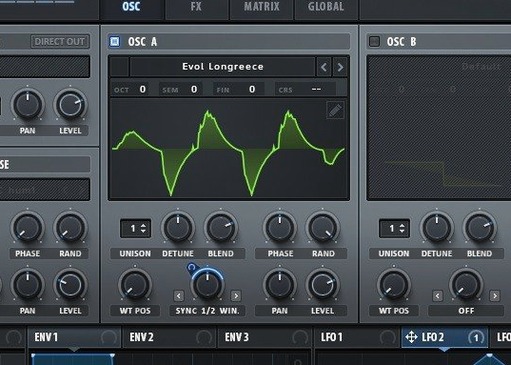
Sample-rate reduction as a filter process — that tells you a lot about where Serum slots into a project.
Track insert — Serum is a wavetable synthesizer built for creating, importing, editing, transforming, and modulating wavetables in real time. Drop it on a synth track and shape from the oscillator up.
Bus duties — Less common, but the filter types found in LFOTool plus the additional new filters make it useful for movement on a return bus. Wavetable modulation can feed a shared reverb or delay without eating a channel strip.
Typical jobs — Basslines, pads, plucks, and textures where unison spread matters. Each wavetable oscillator has advanced unison parameters, so width control happens before you touch a stereo tool.
Session limits — The interface is English. It runs on macOS 10.13 and later, on ARM and x86 64-bit Macs. Serum 2 is part of Xfer Records' VST suite, so it fits a folder of tools rather than a single one-off.
Starting a drop from an init patch and a wavetable
Typical Tuesday. You open a project with a half-finished drop. The bass patch sounds thin. You load Serum on the track and start from init.
- Pick a wavetable. Browse the built-in set or drag in a sample. Serum converts it to a wavetable in real time. You land on something saw-like but with movement in the upper partials.
- Shape the frame. Set oscillator A to 16 voices. That alone thickens the low end before any processing.
- Spread the unison. Pull the Unison WT Pos knob. Each voice grabs a different waveform from the wavetable. The sound stops being one static saw and starts shifting.
- Add note tracking. Route a comb filter to follow the played note. Now the resonant peaks sit musically, not randomly.
- Lay a second layer. Turn on the stack settings and set an octave above. One pressed note now sounds like a small chord. You check mono compatibility — still holds.
- Reduce the sample rate. Insert the sample-rate reduction filter after the main filter. Dial it to taste. The top end turns slightly crunchy, which sits the bass in the mix without extra EQ.
- Record the take. Play a two-bar loop. The movement is already there, so you skip automation for now. Cmd+S. Move on.
Filter routing or closed cutoff kills the sound
- No sound after loading. Check that the oscillator output is routed to the filter. A fresh init can sit with the filter closed. Open the cutoff and bring the mix knob up.
- Unison sounds phasey. Pull back the Unison Warp amount. A little goes a long way with 16 voices. Too much and the low end smears.
- Wavetable import looks wrong. Serum needs the sample length to match the expected table size. Trim or loop the source before import, then re-import.
- High CPU on an older Mac. Drop the unison voices from 16 to 8 while you build the patch. Bring them back before the final bounce.
- Stack settings make every note too big. Use the stack only on the main lead or bass. Leave pads and stabs without stacking, or the arrangement turns to mud.
- DAW doesn't see Serum after install. Rescan your plugin folders. The installer places it in the standard VST and AU paths, but some DAWs need a manual rescan.
Workflow: making a pluck that cuts through
Goal: a pluck for a busy drop. Short, bright, with movement. You have ten minutes.
- Init the patch. Load Serum, start from the default state.
- Choose a wavetable. Pick something glassy. You want upper harmonics from the start.
- Set the envelope. Amp envelope: instant attack, short decay, no sustain. Filter envelope: slightly longer decay so the brightness slides down.
- Add a flanger. Insert it after the filter. Set it to track the note. The flanger now moves with the pitch instead of at a fixed rate.
- Route the mod. Assign an LFO to the WT Pos. Set the LFO to one-shot mode. On every note, the wavetable position sweeps once, then stops.
- Layer a fifth. In stack settings, add a note a fifth above. Keep the volume low. The pluck gains presence without sounding like a chord.
- Check the attack. Bounce a four-bar loop. The transient should be clear. If not, raise the filter envelope amount slightly.
- Save the preset. Name it clearly. You will use it again next week.
Map Unison WT Pos to velocity for touch response
- Unison WT Pos as a mod target. Map it to velocity. Softer notes play narrower waveforms, harder notes go wide. One knob, instant expression.
- Dual filter switching. Set two filter types on the same insert and use a mod source to crossfade between them. You get a moving filter without drawing automation.
- Sample-rate reduction as a tone shaper, not an effect. Dial it to 2–4% and place it after the main filter. The highs dull slightly, which can replace a de-esser on bright pads.
- Comb filter note tracking. Works on plucks and basses. Tune the comb to the root note and the resonances line up with the scale.
- Stack settings for quick octave layers. Faster than duplicating the track. One instance handles the whole layer set.
- Right-click to clear a modulation assignment. Saves hunting through the mod matrix when a routing gets tangled.
- Cmd+click on a knob resets it to default. Standard macOS behaviour, but it works across the whole interface. Useful when a patch drifts.
What's new in 2.0.24
- New Ignore VST3 Note IDs setting — works around note identifier quirks in some hosts.
- Automatable parameter shortcuts now supported in Pro Tools.
- Fixed data loss when opening projects or sessions saved in newer Serum 2 builds.
- Tooltips display correctly in Digital Performer again.
- Intermittent crashes in Digital Performer sorted.
- ACIDized WAV files with empty strc chunks now load without issue.
- Clip Player macro automation updates now work properly in Bitwig Studio.
- MPE values held after voice stealing preserved correctly.
- Piano Roll note preview now respects the velocity of the note you click.
- Avoided a crash when bad data hits Serum's processor.
- Settings interface fixed — was broken since 2.0.22.
- Previous/Next preset buttons no longer jump to ARP — Aardvark after loading a session.
- Pro Tools hang on Windows shutdown fixed.
- Interface scaling corrected in JUCE hosts with non-100% Windows display scaling.
- macOS 10.13 or later
- Apple Silicon or Intel 64-bit
Questions the team asks
Yes. The plugin supports ARM and x86 64-bit Macs.
It includes filter types found in LFOTool along with additional new filters.







Comments 0
Sign in or create an account to add a comment.
No comments yet. They go up after moderation.