
KORG TRITON — Mac download
Download (586 MB) Earlier builds
Ticked
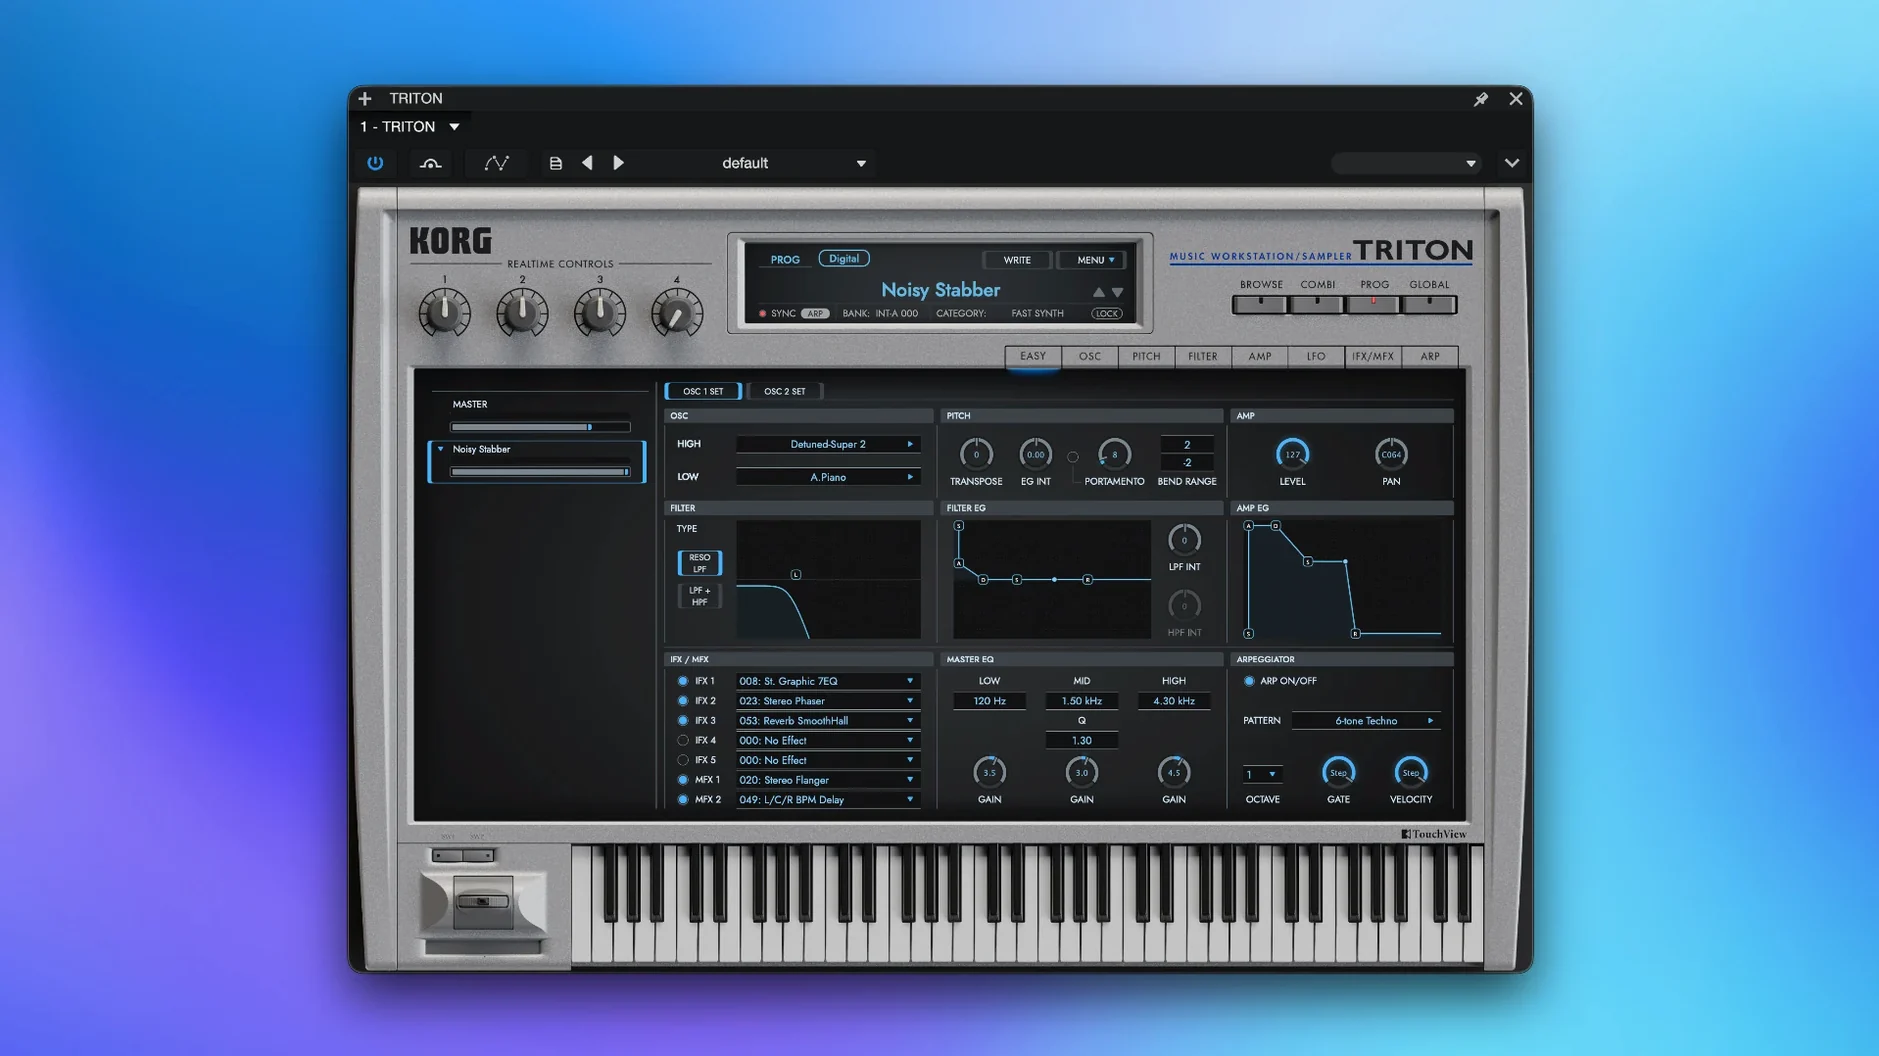
Start with a Dual Poly arpeggiator layered over a split bass combi. That gets you inside the TRITON engine faster than scrolling presets. The software puts the original HI synthesis system onto your Mac, with the full sound set from the hardware workstation.
| Quick facts | |
|---|---|
| Version | 1.4.7 |
| Developer | KORG |
| macOS | 11 or later |
| Architecture | Apple Silicon and Intel |
Good for: sound designers who want a late-90s workstation palette without the desk space. Not for: anyone expecting a stripped-down rompler. This thing runs deep. You get over 4,000 sounds, two filter types, five insert effects, two master effects and a master EQ. Combis let you stack up to eight parts at once. The plug-in loads as a VST with native Apple Silicon support, so it runs without translation overhead on M-series chips.
Loads as a VST instrument in your DAW channel strip
The TRITON plug-in loads inside any VST host. Logic Pro, Ableton Live, Cubase — it sits in your channel strip like any other instrument. That means you can route MIDI from your controller through your DAW's arpeggiator before it hits the TRITON engine. Two layers of pattern generation. Useful for evolving pads that never quite repeat.
On macOS, Audio MIDI Setup sees it as a standalone instrument. You can create an aggregate device, send clock from Logic to the TRITON standalone, and run both without a host. The plug-in also works with Apple's AU Lab for lightweight testing sessions. No DAW needed.
Drag-and-drop MIDI from the TRITON's phrase library into Finder. The files land as standard .mid. Drop them straight into GarageBand, export the resulting region, open in your main DAW. Quick way to sketch an arrangement before the session gets heavy.
The TRITON's master EQ slots after your DAW's channel processing. Order matters. Cut mud with your DAW's linear-phase EQ first, then shape tone with the TRITON's output stage. The filters in the HI engine are the same algorithms from the hardware. They colour the signal. Use that.
Template combis in Bank D teach voice allocation
- Skipping the utility combis. Bank D holds templates — split setups, drum maps, layered strings. Beginners scroll straight to the lead sounds. The templates teach you voice allocation faster than the manual.
- Stacking effects on every part. Five inserts per part looks generous. It is not. Two parts with dense reverb and delay eat polyphony. Use the master effects for shared ambience. Keep inserts for sound-shaping that defines the part.
- Ignoring the oscillator balance. Many presets run both oscillators at full level. Backing one off by 6 dB opens headroom for the filter to do its job. The compressor in the insert chain then grabs a cleaner signal.
- Not saving edited combis as new slots. The TRITON overwrites the current slot on save. Beginners tweak a factory combi, hit save, and lose the original. Duplicate first. Always.
- Forgetting the master EQ is always on. It ships flat but engaged. If your export sounds different from playback, check the EQ band bypass. It catches people who monitor through coloured headphones.
A combi design workflow, start to finish
Task: build a layered pad combi that moves. Start in Combination mode. Initialise an empty slot. Assign part 1 to a warm analogue-style pad from Bank A — something with slow attack and a closed filter. Set its MIDI channel to 01. Assign part 2 to a digital bell tone from the TRITON Extreme bank. Same MIDI channel. Now both parts trigger together.
- Pan part 1 left 30, part 2 right 30. Instant width without effects.
- Drop part 2's volume 4 dB below part 1. The bell sits underneath the pad body.
- Open the Dual Poly arpeggiator on part 1. Set it to a five-step pattern in minor. Gate time at 60%. Let the pad pulse.
- Assign a simple up-down arpeggio to part 2. Offset its start by one step in the step sequencer grid. The bell dances around the pad's gaps.
- Insert a chorus on part 1. Insert a modulated delay on part 2. Keep the delay feedback under 30% or it clouds the transient.
- Route both parts through master effect 1: a hall reverb, 2.5-second decay, low-cut at 200 Hz. Sits the sound in space without booming.
- Save the combi to a user bank slot. Name it. Note the slot number on your track sheet.
Record a four-bar MIDI clip in your DAW. Let the arpeggiators run. Bounce in place. Now you have audio to chop, reverse, or re-pitch outside the TRITON. The combi stays intact for the next section.
Switch to velocity curve 4 or 5 for gradual filter sweeps
- Velocity curve. The default curve is linear. Switch to curve 4 or 5 if your controller has a light action. The TRITON's filter opens more gradually. Pads breathe instead of bark.
- Polyphony limit. The software defaults to 64 voices. Push it to 128 in the system settings. Eight-part combis drop notes fast on the lower setting, especially with sustained release tails.
- Sample rate lock. Set the plug-in to match your project sample rate. The TRITON's PCM library was captured at 48 kHz. Running at 44.1 triggers real-time resampling. Negligible CPU difference, cleaner transients at native rate.
- Arpeggiator sync. Defaults to internal clock. Change to external MIDI clock if you want tempo from your DAW's transport. Internal clock drifts over long takes when unlinked.
- Category filter. The preset browser opens showing all sounds. Switch the category filter to "Synth Pad" or "Motion Synth" before you start a session. Cuts scroll time in half.
- macOS 11 or later
- Apple Silicon or Intel processor
- VST-compatible host
Questions the team asks
It contains more than 4,000 sounds drawn from the original TRITON and TRITON Extreme workstations.
Yes, the eight-part combi mode lets you layer and split up to eight sound parts, just like the hardware original.



Comments 0
Sign in or create an account to add a comment.
No comments yet. They go up after moderation.