
Imagenomic Portraiture — Mac download
Download (65 MB) Earlier builds
Ticked
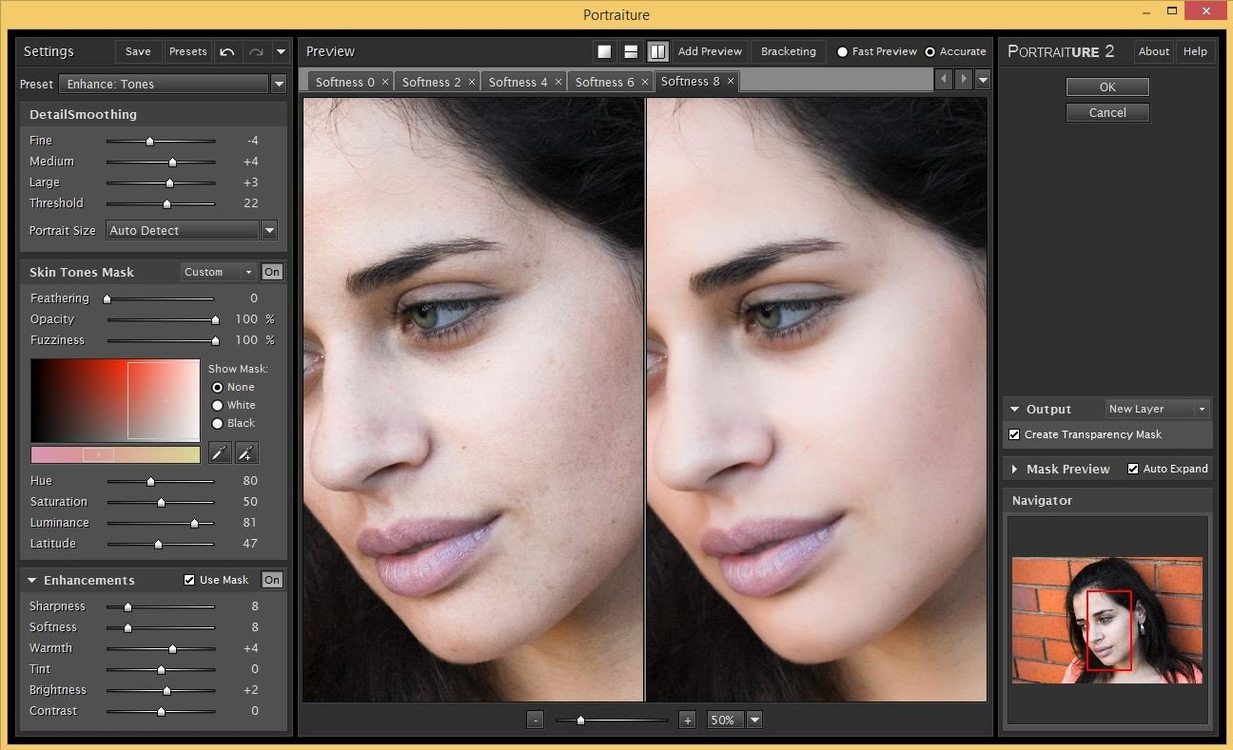
Anyone who has painted layer masks by hand in Photoshop knows the routine. Portraiture slots into that same workflow and takes over the selective masking part entirely. It works as a plugin for Photoshop and Lightroom Classic, running natively on Apple Silicon and Intel Macs from macOS 13 upwards.
- Separate builds for Photoshop and Lightroom Classic — pick the one that matches your host app.
- No manual masking required. The plugin isolates skin tones and applies smoothing on its own.
- Runs on ARM and x86 64-bit systems, so Apple Silicon Macs are covered.
- English interface only, with minimal controls that sit inside the host application.
- macOS compatibility listed as 13 and later, with the product page also noting macOS 15+ support.
It does one job inside tools you already have open. The smoothing engine in build 4501 has been updated, but the core idea stays the same: less time painting masks, more time on the edit.
A retouching workflow, start to finish
Open a portrait in Photoshop. Duplicate the background layer first — never work on the original pixels. Launch Portraiture from the Filter menu. The plugin scans the image and builds a skin mask automatically.
- Zoom to 100% on the face. Check the mask preview (tick Show Mask in the top-left corner).
- Tweak the Sensitivity sliders if the mask spills into hair or clothing. Slide Skin down a touch for subjects with heavy stubble.
- Set Smoothing to a moderate value — start around 4 for studio-lit portraits, 6 for outdoor shots with deeper texture.
- Push Sharpness slightly above the default to keep eyelashes and brow definition crisp.
- Toggle the before/after view (spacebar or the split-screen icon). Check the eyes, lips and jewellery — those areas should stay untouched.
- Hit OK. Add a black layer mask to the result, then paint white with a soft brush over the skin you want smoothed. This retains full manual override.
The whole pass takes under a minute. The plugin handles the heavy lifting; the brush-on-mask step adds surgical control.
Swap 'Default' for a preset tuned to your lighting
The defaults are sensible but generic. A handful of adjustments make the plugin feel tuned to your own work.
- Preset selector — don't ignore it. Start with Default, drag the sliders to suit, then save a preset per lighting setup (studio strobe, window light, overcast outdoor). Name them clearly.
- Output panel — switch from Apply to layer to New layer. This keeps the smoothed result separate, letting you mask or reduce opacity later without re-running the filter.
- Mask refinement — the eyedropper tools under the mask preview let you click on missed skin tones or false positives. Use them once per session; the mask learning improves with every click.
- Texture grain — if portraits start to look plastic, tick Add grain in the Output panel. A tiny amount (low single digits) matches the original sensor noise and stops skin looking airbrushed.
- Host-specific build — if you work in both Photoshop and Lightroom Classic, install both builds. The Lightroom version preserves non-destructive workflow and saves edits as a plugin step in the Develop history.
Fitting Portraiture into a wider editing stack
The plugin works best when it arrives at the right point in the edit chain, not as a first step.
In Lightroom Classic, do your basic tone curve, white balance and exposure corrections first. Send the image to Portraiture via Photo > Edit In. The TIFF that returns sits stacked with the original RAW, and the smoothing lives on a separate pixel layer if you set the Output panel accordingly.
In Photoshop, pair Portraiture with frequency separation. Run frequency separation on a duplicated layer, then apply Portraiture only to the low-frequency (colour and tone) layer. This keeps texture detail on the high-frequency layer completely untouched — a cleaner result than running the plugin flat on the merged image.
The plugin also plays well with Affinity Photo users on Mac. The product page lists Affinity as a supported host, and the Photoshop build loads as a filter under the Plugins menu. The same output-to-new-layer habit applies here.
For batch work, create a Photoshop action that calls Portraiture with a saved preset, then run it via File > Automate > Batch. This processes headshot sessions while you step away, though checking the mask on a few samples first is still good practice.
macOS integration is straightforward. The installer places plugin files in the host app's plug-ins folder. If you switch between an Intel Mac and an Apple Silicon machine, the universal binary build means no configuration changes are needed — the same installer covers both architectures under macOS 13 and later.
For those hunting down a portraiture download mac option, the separate Lightroom and Photoshop builds are supplied as distinct disk images. Mount the correct one for your host, run the Gatekeeper-friendly script in Terminal when prompted, and the installer places everything where the host expects to find it.
- Build numbered 4501.
- Next-generation AI smoothing engine.
- macOS 13 or later
- Apple Silicon or Intel Mac
Questions the team asks
Imagenomic provides separate plugin builds for Adobe Photoshop and Lightroom Classic.
Yes. The plugin supports both ARM and x86 64-bit architectures.
It is compatible with macOS 13 and later, with the product page listing macOS 15 and above.







Comments 0
Sign in or create an account to add a comment.
No comments yet. They go up after moderation.